Pages

Tuesday, May 27, 2008

Easy ways to customize your Outlook toolbar

Here are some easy ways you can get your Outlook toolbar to look and function the way you want it.

  1. Right-click the toolbar you want to change, and then click Customize.
    This puts your toolbar in customize mode.
  2. You can now do one or more of the following:
    • To move a button to another location on the same toolbar or to another toolbar, click a button, and then drag it to where you want it.
    • To create a button for a command, click any menu, click the command on the menu, and then drag the command to the toolbar.
    • To resize the width of the Find a Contact and Current View boxes, click the box, and then rest the mouse pointer on the left or right border until the resize icon appears. Now drag the border to stretch the box to the width you want.

I want share my experience with Microsoft Outlook 2002 Support and Computer Help

Tuesday, May 20, 2008

Sort your e-mail twice in Outlook

So your Outlook Inbox is a mess. You have 150 pieces of unread messages from six months ago that are still not hidden away in folders. And you know you received an invitation to a meeting, but you don't remember when you received it. Good news: It's easy to find it. You can sort and then sort again.

  1. Click the Icon column heading in your Inbox. This organizes everything by type of e-mail — responses, invitations, and so on, each of which appear with a different icon in your Inbox.
  2. Highlight all of the messages that belong to the type you are looking for — in this case, meeting invitations.
  3. Click the Received column heading in the Inbox to sort again, this time by date. The items you highlighted remain highlighted, and you can spot the invitation you are looking for easily.

You can sort on any of the column headings in your Inbox. Each sort will become more refined as you select items.

I will continue with more information after few day, Now I want to share my Experience with Microsoft Outlook, Computer Help and Technical Support

Friday, May 16, 2008

Microsoft Outlook POP3 e-mail accounts

When you retrieve e-mail messages from a POP3 (POP3: A common protocol that is used to retrieve e-mail messages from an Internet e-mail server.)” e-mail account, the messages are deleted from the e-mail server by default after they are downloaded to your computer. For many people, this works great.

However, if you want to check your e-mail from multiple computers, you must configure Outlook to not delete the messages on your e-mail server. This scenario is most common for people who want to check their home Internet service provider (ISP) e-mail account from work and download the messages for permanent storage on their home computer Help.

When you leave messages on your e-mail server, you can choose from several options to delete your messages. To make your choice, you need to consider several factors about your e-mail usage, such as how long you want the messages to be accessible from multiple computers and the storage limits imposed by your e-mail server administrator. If you exceed your storage limit, you might be unable to receive new messages or might be charged additional fees. Typically, it is best to have one computer set to the default setting that doesn't leave e-mail messages on the e-mail server. When you use the computer to retrieve your e-mail messages, they are downloaded and deleted from the e-mail server. If you choose not to do this, Outlook allows you to select a time duration for leaving e-mail messages on the server.

  1. On the Tools menu, click E-mail Accounts.
  2. Click View or change existing e-mail accounts, and then click Next.
  3. Select your ISP account, and then click Change.
  4. Click More Settings.
  5. Click the Advanced tab, and under Delivery, select the Leave a copy of messages on the server check box.
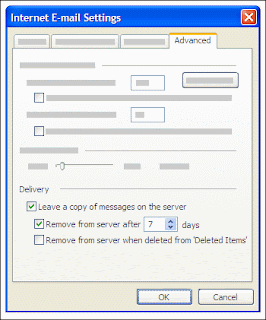
· Select one of the following options:

  • Remove from server after x days E-mail messages are downloaded to your computer but remain on the e-mail server for the number of days that you specify. This is the most common setting for people who want to read their messages at work but also download them for permanent storage on their home computer. We recommend that you choose the smallest number of days that suits your needs. The longer you leave messages on your e-mail server, the greater the risk of exceeding your mailbox size quota.
  • Remove from server when deleted from 'Deleted Items' E-mail messages are downloaded to your computer but also remain on the e-mail server indefinitely until you delete the e-mail message in Outlook and empty the Deleted Items folder. Just deleting the message doesn't remove the message from the e-mail server.

If you do not select either check box, messages are left on the server indefinitely. You can eventually exceed your mailbox quota, unless you connect to the e-mail server from another computer that has Microsoft Outlook configured to remove messages from the e-mail server.

· Click OK, and then click Finish.

Tuesday, May 13, 2008

How to Change the display name that e-mail recipients see

Do your e-mail recipients see only part of your name, for example only your first name, but you want them to see your full name?


When you first set up your e-mail account, you might have not typed your full name. You can easily correct this in the E-mail Account configuration.


1. On the Tools menu, click E-mail Accounts.

2. Click View or change existing e-mail accounts, and then click Next.

3. Select your Internet service provider (ISP) account, and then click Change.

4. Under User Information, in the Your Name box, type your name the way that you want other people to see your name.


5. Click Next, and then click Finish.

I have to sketch out the details once again before this Monday for a official presentation. But then what i want to share here with you is my experience of sharing the Microsoft Outlook and providing a computer Help

Thursday, May 8, 2008

How to Customize Microsoft Outlook

Here are some easy ways you can get your Microsoft Outlook toolbar to look and function the way you want it.

  1. Right-click the toolbar you want to change, and then click Customize.
    This puts your toolbar in customize mode.
  2. You can now do one or more of the following:
    • To move a button to another location on the same toolbar or to another toolbar, click a button, and then drag it to where you want it.
    • To create a button for a command, click any menu, click the command on the menu, and then drag the command to the toolbar.
    • To resize the width of the Find a Contact and Current View boxes, click the box, and then rest the mouse pointer on the left or right border until the resize icon appear Now drag the border to stretch the box to the width you want.

Monday, May 5, 2008

Synchronize your Pocket PC with Outlook

You can synchronize e-mail messages, calendar items, contacts, notes, and tasks between Outlook and your Pocket PC by using Microsoft ActiveSync®. With ActiveSync, you can create a partnership between your Pocket PC and desktop computer Help by using a cable, cradle, or infrared. After you create a partnership, you can synchronize your data by using a modem or network (Ethernet) card if your Pocket PC supports it. You can also use your existing computer to connect to other resources through ActiveSync. You can synchronize information between your mobile device and a server if your company is running Microsoft Exchange Server with Exchange ActiveSync.

Outlook POP3 e-mail account

In the New Partnership Wizard, choose to synchronize with the Inbox, which is part of Microsoft Outlook.

  1. On your desktop computer, open ActiveSync.
  2. In ActiveSync, click Options.
  3. Under Server, select the Enable synchronization with a server check box.
  4. Click Configure.
  5. Select the types of information that you want to synchronize.

Note To change the settings for the type of information, click the type of information, and then click Settings.

  1. To change your server connection information, under Server Connection, click Connection.
  2. Click OK three times.